SpringBoot整合SSM + Shiro + Thymeleaf搭建web项目(配置部分)
SpringBoot的具体介绍可以参看其他网上介绍,这里就不多说了,个人理解,简而言之:
- 它是Spring的升级版,Spring容器能做到的事情,它都能做到,而且更简便,从配置形式上来说,SpringBoot完全抛弃了繁琐的XML文件配置方式,而是替代性地用注解方式来实现,虽然本质来说,是差不多的(类似包扫描,注解扫描,类加载之类)。
- SpringBoot集成的插件更多,从而使用很多服务,都只是引入一个依赖,几个注解和Java类就可以用了,具体的参考相关手册。
- 在Web应用开发这一块,之前的应用一般来说是打包成war包,再发布到相关服务器容器下(例如Tomcat),虽然SpringBoot也可以这么做,但在SpringBoot下更常见的形式是将SpringBoot应用打包成可执行jar包文件。之所以这么做,源于你可以直接将SpringBoot应用看成是一个Java Application,其Web应用可以没有webapp目录(更不用说web.xml了),它推荐使用html页面,并将其作为静态资源使用。
引入SpringBoot的父工程,只要是要用SpringBoot,就一定要引。或者公司有自己的父工程时可以使用SpringBoot插件。我这里是以2.0版本来做示例,有少部分配置会与1.5X的不一样
         <parent>
            <groupId>org.springframework.boot </groupId>
                <artifactId>spring-boot-starter-parent </artifactId>
                <version>2.0.0.RELEASE </version>
         </parent>
引入Spring AOP
        <dependency>
            <groupId>org.springframework.boot</groupId>
            <artifactId>spring-boot-starter-aop</artifactId>
        </dependency>
引入tomcat,这里的引入方式是使用SpringBoot内置tomcat,最后以jar包形式运行
        <dependency>
            <groupId>org.springframework.boot</groupId>
            <artifactId>spring-boot-starter-web</artifactId>
            <!-- 移除嵌入式tomcat插件 -->
            <!--<exclusions>
                <exclusion>
                <groupId>org.springframework.boot</groupId>
                <artifactId>spring-boot-starter-tomcat</artifactId>
                </exclusion>
            </exclusions>-->
        </dependency>

        <dependency>
            <groupId>org.springframework.boot</groupId>
            <artifactId>spring-boot-starter-tomcat</artifactId>
        </dependency>
整合Mybatis,首先引入依赖,mysql连接依赖
        <dependency>
            <groupId>org.springframework.boot</groupId>
            <artifactId>spring-boot-starter-jdbc</artifactId>
        </dependency>

        <dependency>
            <groupId>org.mybatis.spring.boot</groupId>
            <artifactId>mybatis-spring-boot-starter</artifactId>
            <version>1.3.0</version>
        </dependency>

        <dependency>
            <groupId>mysql</groupId>
            <artifactId>mysql-connector-java</artifactId>
            <version>5.1.35</version>
        </dependency>
开始配置DataSource,首先新建一个jdbc.properties文件来写入jdbc的基本信息:
        jdbc.username=***
        jdbc.password=***
        jdbc.url=***
        jdbc.driver=com.mysql.jdbc.Driver
数据根据自己的实际情况来写,不需要创建配置文件,因为SpringBoot的好处就是摆脱配置文件,然后新建一个类DataSourceConfig,在类名上加上
@Configuration注解,代表这就是相当于配置文件。
/**
 * @author hengsir
 * @date 2018/1/29 上午11:33
 */
@Configuration
@PropertySource(value = {"classpath:jdbc.properties"})//读取刚刚的properties文件
public class DataSourceConfig {

    @Value("${jdbc.username}")//根据properties文件中的key,读取出对应的value
    private String jdbcUserName;

    @Value("${jdbc.password}")
    private String jdbcPassWord;

    @Value("${jdbc.url}")
    private String jdbcUrl;

    @Value("${jdbc.driver}")
    private String jdbcDriver;

    @Bean//等于xml文件中<Bean>
    public DataSource dataSource(){
        DruidDataSource druidDataSource = new DruidDataSource();
        druidDataSource.setDriverClassName(jdbcDriver);
        druidDataSource.setUsername(jdbcUserName);
        druidDataSource.setPassword(jdbcPassWord);
        druidDataSource.setUrl(jdbcUrl);
        druidDataSource.setMaxActive(10);
        druidDataSource.setMinIdle(5);
        return druidDataSource;
    }

}
然后创建Mybatis的配置类,MybatisConfig这里根据自己的需要来进行配置,我毕设中用到了分页的小插件,展示下
/**
 * @author hengsir
 * @date 2018/1/29 下午2:24
 */
@Configuration
public class MybatisConfig {

    @Autowired
    private DataSource dataSource;//刚刚的DataSourceConfig中的dataSource()返回的对象会被容器所管理,所以可以注入获取

    //配置mybatis的分页插件pageHelper
    @Bean
    public PageHelper pageHelper() {
        PageHelper pageHelper = new PageHelper();
        Properties properties = new Properties();
        properties.setProperty("offsetAsPageNum", "true");
        properties.setProperty("rowBoundsWithCount", "true");
        properties.setProperty("reasonable", "true");
        properties.setProperty("dialect", "mysql");    //配置mysql数据库的方言
        pageHelper.setProperties(properties);
        return pageHelper;
    }

    @Bean
    public SqlSessionFactoryBean sqlSessionFactoryBean(PageHelper pageHelper) throws IOException {
        SqlSessionFactoryBean sqlSessionFactoryBean = new SqlSessionFactoryBean();
        sqlSessionFactoryBean.setDataSource(dataSource);
        sqlSessionFactoryBean.setPlugins(new Interceptor[]{pageHelper});
        return sqlSessionFactoryBean;
    }

}
然后就可以创建相应的dao层内容,要注意:1、Mpaaer接口要添加@Component注解。不然SpringBoot是无法扫描到Mapper接口
2、Mapper接口与Mapper.xml在同一包结构下,你可以直接都在同一个包下,或者在resources/下 创建与Mapper接口相同的包结构,然后把Mapper.xml移进去例如:

整合SpringMVC与Thymeleaf,其实在SpringBoot中,有个最重要的application.properties文件,在这里可以配置所有跟整合有关的,比如 我们以前学SpringMVC只需要配置视图解析器,在这里就可以进行配置
            spring.mvc.view.prefix=/templates/
            spring.mvc.view.suffix=.html
除了视图解析器,我们还有拦截器,那要配置拦截器就要在配置类中进行了,新建SpringMVCConfig
/**
 * @author hengsir
 * @date 2018/2/28 上午10:10
 */
@Configuration
public class SpringMVCConfig {

    @Autowired
    private MenuHandlerInterceptor menuHandlerInterceptor;//这是菜单拦截器

    @Autowired
    private LoginInterceptor loginInterceptor;?//这是登录拦截器

    @Bean
    public WebMvcConfigurer webMvcConfigurer() {//这里是给拦截器添加需要拦截的路径或者不需要拦截的
        WebMvcConfigurer config = new WebMvcConfigurer() {
            @Override
            public void addInterceptors(InterceptorRegistry registry) {
                registry.addInterceptor(loginInterceptor).addPathPatterns("/**")
                        .excludePathPatterns("/**/*.json",
                                "/**/fonts/*",
                                "/**/*.css",
                                "/**/*.js",
                                "/**/*.png",
                                "/**/*.gif",
                                "/**/*.jpg",
                                "/**/*.docx",
                                "/**/*.jpeg");
                registry.addInterceptor(menuHandlerInterceptor).addPathPatterns("/**")
                        .excludePathPatterns("/favicon.ico",
                                "/css/**",
                                "/js/**",
                                "/images/**",
                                "/download/**",
                                "/Users/**",
                                "/metronic/**");
            }

        };
        return config;

    }
}
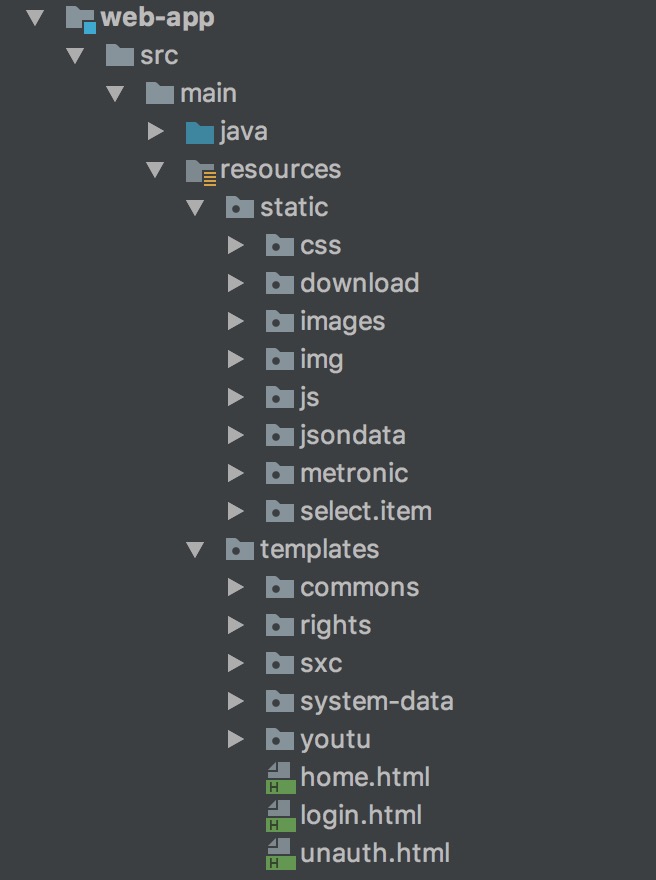
完成这些后,可以自行编写Controller了。 如果没了解过Thymeleaf的可以自行百度去了解下,这是一个用于页面展示类似于jsp有很多小功能的框架,要使用它,静态资源文件与html文件一 定要根据配置的路径来放,不然后果自己想。我就按着默认的来,默认的包含html的文件夹是放在resources/templates/下的,所以需要手动创 建一个templates/的目录;然后就是css,js,image这些内容要放在resources/static/下,也要手动创建,如下图:
需要在application.properties文件中加入
        spring.thymeleaf.prefix=classpath:/templates
        spring.thymeleaf.cache=false
        spring.thymeleaf.encoding=utf-8
这里要注意,在html中,使用Thymeleaf来引入静态资源时,推荐使用 @{} 格式来引入,这是绝对路径的写法,因为我们的html文件在templates/login.html,
我们需要引入static/css/login.css
        <link th:href="@{/css/login.css}" rel="stylesheet" type="text/css"/>
        <!--springboot会自动的在静态文件引入时从static目录找,所以可以省略写上static目录 -->
整合Shiro,引入依赖
        <dependency>
            <groupId>org.apache.shiro</groupId>
            <artifactId>shiro-core</artifactId>
            <version>1.4.0</version>
            <exclusions>
                <exclusion>
                    <groupId>org.slf4j</groupId>
                    <artifactId>slf4j-api</artifactId>
                </exclusion>
            </exclusions>
        </dependency>

        <!--这是保证在Shiro权限标签可以在Thymeleaf上使用-->
        <dependency>
            <groupId>com.github.theborakompanioni</groupId>
            <artifactId>thymeleaf-extras-shiro</artifactId>
            <version>2.0.0</version>
        </dependency>

        <dependency>
            <groupId>org.apache.shiro</groupId>
            <artifactId>shiro-web</artifactId>
            <version>1.4.0</version>
        </dependency>

        <dependency>
            <groupId>org.apache.shiro</groupId>
            <artifactId>shiro-spring</artifactId>
            <version>1.4.0</version>
        </dependency>

        <dependency>
            <groupId>org.apache.shiro</groupId>
            <artifactId>shiro-cas</artifactId>
            <version>1.4.0</version>
        </dependency>
然后新建配置类,ShiroConfig
/**
 * @author hengsir
 * @date 2018/2/27 上午10:09
 * 集成shiro配置
 */
@Configuration
public class ShiroConfig {


    @Autowired
    private ShiroRealService shiroRealService;


    //配置核心安全事务管理器
    @Bean(name="securityManager")
    public SecurityManager securityManager(ShiroReal shiroReal) {
        DefaultWebSecurityManager manager=new DefaultWebSecurityManager();
        manager.setRealm(shiroReal);
        return manager;
    }

    @Bean
    public FilterRegistrationBean delegatingFilterProxy(){
        FilterRegistrationBean filterRegistrationBean = new FilterRegistrationBean();
        DelegatingFilterProxy proxy = new DelegatingFilterProxy();
        proxy.setTargetFilterLifecycle(true);
        proxy.setTargetBeanName("shiroFilter");
        filterRegistrationBean.setFilter(proxy);
        return filterRegistrationBean;
    }


    @Bean("shiroFilter")
    public ShiroFilterFactoryBean shiroFilter(@Qualifier("securityManager") SecurityManager manager) {
        ShiroFilterFactoryBean bean=new ShiroFilterFactoryBean();
        bean.setSecurityManager(manager);
        //配置登录的url和登录成功的url
        bean.setLoginUrl("/login");
        bean.setSuccessUrl("/home");
        //配置访问权限,如果不把静态资源加上配置,默认的话是会被拦截,会出现没有样式的情况,所以根据自己的结构进行配置
        LinkedHashMap<String, String> filterChainDefinitionMap=new LinkedHashMap<>();
        filterChainDefinitionMap.put("/metronic/**","anon");
        filterChainDefinitionMap.put("/favicon.ico", "anon"); //表示可以匿名访问
        filterChainDefinitionMap.put("/images/**", "anon");
        filterChainDefinitionMap.put("/User/**", "anon");
        filterChainDefinitionMap.put("/css/**","anon");
        filterChainDefinitionMap.put("/js/**","anon");
        filterChainDefinitionMap.put("/select/**","anon");
        filterChainDefinitionMap.put("/jsondata/**","anon");
        filterChainDefinitionMap.put("/download/**","anon");
        filterChainDefinitionMap.put("/api/**","anon");
        filterChainDefinitionMap.put("/manage/login","anon");
        filterChainDefinitionMap.put("/manage/genCaptcha","anon");
        filterChainDefinitionMap.put("/manage/logout","logout");
        filterChainDefinitionMap.put("/unauth","anon");
        filterChainDefinitionMap.put("/error/notfound","anon");
        filterChainDefinitionMap.put("/error/innererror","anon");
        filterChainDefinitionMap.put("/**", "user");//表示需要认证才可以访问
        bean.setFilterChainDefinitionMap(filterChainDefinitionMap);
        return bean;
    }

    @Bean
    public ShiroReal shiroReal(CredentialsMatcher matcher){
        ShiroReal shiroReal = new ShiroReal();
        shiroReal.setCredentialsMatcher(matcher);
        return shiroReal;
    }

    /**
     * rememberMe管理器,cipherKey生成见{@code Base64Test.java}
     *
     * @return
     */

    @Bean
    public SimpleCookie rememberMeCookie() {
        SimpleCookie simpleCookie = new SimpleCookie("rememberMe");
        simpleCookie.setHttpOnly(true);
        simpleCookie.setMaxAge(7 * 24 * 60 * 60);
        return simpleCookie;
    }

    /**
     * rememberMe管理器
     *
     * @return
     */

    @Bean
    public CookieRememberMeManager cookieRememberMeManager(SimpleCookie rememberMeCookie) {
        CookieRememberMeManager cookieRememberMeManager = new CookieRememberMeManager();
        cookieRememberMeManager.setCipherKey(Base64.decode("empodDEyMwAAAAAAAAAAAA=="));
        cookieRememberMeManager.setCookie(rememberMeCookie);
        return cookieRememberMeManager;
    }

    /**
     * 开启shiro aop注解支持. 使用代理方式;所以需要开启代码支持; Controller才能使用@RequiresPermissions
     *
     * @param securityManager
     * @return
     */

    @Bean
    public AuthorizationAttributeSourceAdvisor authorizationAttributeSourceAdvisor(
            @Qualifier("securityManager") SecurityManager securityManager) {
        AuthorizationAttributeSourceAdvisor authorizationAttributeSourceAdvisor =
                new AuthorizationAttributeSourceAdvisor();
        authorizationAttributeSourceAdvisor.setSecurityManager(securityManager);
        return authorizationAttributeSourceAdvisor;
    }

    /**
     * 会话管理器
     *
     * @return
     */

    @Bean
    public DefaultWebSessionManager sessionManager(EnterpriseCacheSessionDAO sessionDAO) {
        DefaultWebSessionManager sessionManager = new DefaultWebSessionManager();
        //设置全局会话超时时间 半小时 session共享将取决与sessionDao中cacheManager缓存存储时长
        sessionManager.setGlobalSessionTimeout(3 * 1000 * 60);
        sessionManager.setSessionDAO(sessionDAO);
        sessionManager.setSessionIdCookie(new SimpleCookie("ICMA_SHIRO_SESSIONID"));
        return sessionManager;
    }

    /**
     * 会话DAO 用于会话的CRUD
     *
     * @return
     */

    @Bean
    public EnterpriseCacheSessionDAO sessionDAO() {
        EnterpriseCacheSessionDAO sessionDAO = new EnterpriseCacheSessionDAO();
        sessionDAO.setActiveSessionsCacheName("manager-activeSessionCache");
        return sessionDAO;
    }

    @Bean
    public ShiroDialect shiroDialect() {
        return new ShiroDialect();
    }

}
最后,添加启动类,在开关说过,这里采用Springboot的jar包形式启动,所以就是一个Java Application,新建一个类,写上main方法
/**
 * @author hengsir
 * @date 2018/3/1 下午3:22
 */
@SpringBootApplication//这是启动类的注解,会扫描这个类所在包的下面所有包的注解进行管理
@MapperScan("org.hengsir.icma.dao.mapper")
public class Main {
    public static void main(String[] args) {

        //这就是Springboot官方的启动方式,参数就是有@SpringBootApplication注解的类类型与main方法参数
        SpringApplication.run(Main.class, args);

        System.out.println("-----------------嘤嘤嘤嘤嘤~~~~启动成功!!!!!------------------"
                + new SimpleDateFormat("yyyy-MM-dd hh:mm:ss").format(new Date()));
    }
}
看到下图说明启动成功了 
到这里,Springboot整合SSM+Shrio+Thymeleaf的配置就完成了,下面说下一些需要注意的地方,都是我踩过的坑,在这里分享出来 让你们都可以少走弯路。
- 启动类一定要加上@SpringBootApplication注解,并且一定要处于所以类的顶包,意思就是目录如果为 org.hengsir.test,此目录下还有controller,service,dao....这些包下面都有相应的注解@Controller, @Service。如果想要被管理起来可以自动注入的话,启动类一定要在这些包的上层结构中,就是一定要在org,org.hengsir, org.hengsir.test下;如果在controller下,那service与dao中的都不会被扫描到。
- 静态文件的位置,上面也说了,最好就按着默认的来,我尝试过自己配置,没成功过,所以我推荐根据默认的来。css,js,images等 文件放置在resources/static下,没有static的可以自己创建;html文件放在resources/templates/下
- Mybatis中定义的mapper接口,请加上@Service或者@Component注解,不然是不会被启动类扫描到。
- 除了jar包运行的,还可以打成war包,放到外置tomcat中运行这里暂不提供具体方法。
这是第一次发出自己总结的经验,会有很多问题,但如果有使用过以上框架的经验的话应该看懂不难,写作能力有待提高。
〔完〕
写留言
请留下您想说的: